Place-and-press dimension measurement
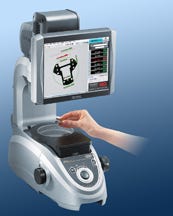
High-precision inspection of part dimensions has never been easier than with the IM-6000 Series visual system, according to its maker Keyence Corp. of America (Woodcliff Lake, NJ). The IM-6000 eliminates the need for optical comparators, x-y stages for part positioning, CNC measuring devices, and measuring and stereomicroscopes. Innovative Pattern Registration and Pattern Search functions provide simplified place-and-press measurement operation.
February 3, 2010
High-precision inspection of part dimensions has never been easier than with the IM-6000 Series visual system, according to its maker Keyence Corp. of America (Woodcliff Lake, NJ). The IM-6000 eliminates the need for optical comparators, x-y stages for part positioning, CNC measuring devices, and measuring and stereomicroscopes. Innovative Pattern Registration and Pattern Search functions provide simplified place-and-press measurement operation.
|
Parts to be measured are placed on the IM-6000’s sample tray and the measurement button pressed. No careful positioning of a part is necessary. An Intelligent Pattern Analysis Search System (iPass) quickly and automatically locates, identifies, and measures parts placed anywhere within the unit’s 100-mm field of view, thus eliminating the need for an x-y stage. A Part Evaluation Library stores the images, measurement functions, and specifications of parts and provides automatic Pattern Search, part recognition, and measurement without setup the next time inspection of the same parts is performed. The system eliminates the tedious setup and measurement time of conventional systems, allowing users to begin collecting data in just minutes following setup.
The IM-6000 quickly performs up to 99 distinct measurements with the press of a button, such as angle, radius, inner/outer diameter, and circular and linear pitch. High-precision image acquisition and sub-pixel processing allows measurement of features that were previously impossible to inspect with traditional dimensional measurement systems. —[email protected]
About the Author(s)
You May Also Like


