The Troubleshooter, Part 113: Treat polycarbonate with respect or you will pay the price
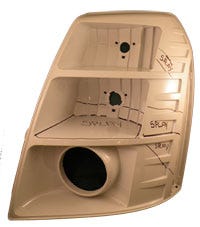
A decent part has an unfortunate gate design.A couple of months ago, I received a part and runner from an old friend. His note said this part had been bugging him for some time and he needed a little help. I opened the box and found a housing and a runner system. The part was marked up, indicating the problem that was most important to them was splay on the front. I could see the material being used was polycarbonate or at least a PC/ABS alloy (I treat both the same for troubleshooting purposes).
June 1, 2009
A decent part has an unfortunate gate design.
A couple of months ago, I received a part and runner from an old friend. His note said this part had been bugging him for some time and he needed a little help. I opened the box and found a housing and a runner system. The part was marked up, indicating the problem that was most important to them was splay on the front. I could see the material being used was polycarbonate or at least a PC/ABS alloy (I treat both the same for troubleshooting purposes).
|
I got out my measuring tools and started writing down numbers. The wall thickness was pretty much 0.125 inch everywhere I could take a measurement. The runner was interesting; I could see this mold had two cavities with a cold runner feeding the gates and a heated sprue bushing feeding the cold runner. The full-round runner measured 0.370 inch, the cone-shaped feedpoint to the runner measured 0.250 inch, and I measured the hot drop into this cone shape at a diameter of 0.135 inch. The gates were approximately 2 inches wide with a tapered land of 0.312 inch, and the gate depths were 0.075 inch the full length of the gate width.
I could tell pretty quickly that the splay problem was no doubt due to a combination of factors, mostly in the areas of runner and gates. PC is a very shear-sensitive material and any restrictions to material flow cause cosmetic problems on part surfaces.
The cold runner did not have any splay or surface defects, so I ruled out the feedpoint to the runner as being part of the problem. The runner diameters were large enough to rule them out, so that left the gates as the place to look for getting rid of the splay.
For PC, I use a rule of thumb that says the gate depth should be 90% of the wall thickness where we are gating, and we always gate at the thickest section of the part. This meant that the gate depth needed to be 90% of the wall thickness, or 0.112 inch. With most big parts, I like to make the gate at least twice as wide as it is deep, but since the gate was already 2.00 inches wide, I decided to use what I had to work with and make the gate 0.112 inch deep and leave it at 2.00 inches wide.
|
The gate land length should always be one-half the gate depth, but never exceed 0.030 inch. In this case, we had a real problem since the land length was 0.312 inch and it needed to be only 0.030 inch.
Another serious issue was the shape of the gate. I find that all amorphous materials—for example, PC—cause less trouble for molders when the gate design uses an abrupt transition design instead of a tapered one. This meant we had to bring the runner diameter of 0.312 inch to within 0.030 inch of the part, and then drop down to the gate depth of 0.112 inch to transition the material into the part wall.
The complication with using the existing runner plate was that we were stuck with a 2-inch gate width instead of the 0.225 or 0.336 inch that was needed. When a gate is too wide, the material’s flow front can sag during injection, trapping air in the interior of the part, so either the injection speed needs to be faster, or the gate needs to be narrower. Now, PC needs to be run with very fast injection speeds, so a wide gate might not be such a bad problem if you know what to do; but sometimes it’s better to weld up the old gate or cut a new runner plate than take the chance.
This was a good part to practice troubleshooting on since the part design was sound; the mold was well built and well polished. The inside corners were radiused at 50% and the outside corners at 150%—there was not a notch-sensitive area anywhere and, except for the surface splay, this was an excellent-looking part. It was a shame that something like the wrong gate design caused so much trouble with the cosmetics. In fact, the gate design used is perfect for high-density polyethylene or polypropylene large parts; just not for amorphous materials.
I called the molder, checked on how he was handling the downturn in the economy, and how his customers were reacting. I spent some time finding out about his family and then told him I had a few suggestions for getting rid of his splay and would send them to him shortly.
It took two or three weeks before I heard back from him. He said he had been running good parts for more than a week after he made the changes but didn’t want to jinx anything by bragging about his success. What he probably doesn’t understand is that he opened up his processing window and his molding problems have gone away—what could go wrong?
The Troubleshooter’s notebook Part/material: Large PC pr PC/ABS part. Tool: Two-cavity cold runner, heated sprue brushing.. Symptoms/problem: Splay on the front.. Solution: Enlarge gate depth; bring runner within 0.030 inch of the part and drop down to the gate for an abrupt transition to compensate for extra-long gate land; increase injection speeds, and either cut a new runner plate or weld up the gate to decrease gate width. |
About the Author(s)
You May Also Like


