The Troubleshooter, Part 125: Dirty parts have a story to tell
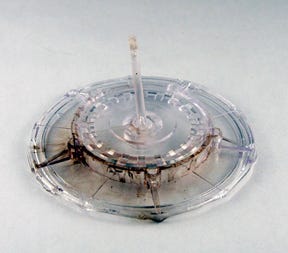
Some troubles are very resistant to shooting, so consider packing a knife.I was surprised the other morning when a molder I have known for a few years showed up at my office. He came bearing gifts in the form of a grocery sack full of clear parts that appeared dirty—they had large black streaks in the middle of the part.
October 6, 2010
Some troubles are very resistant to shooting, so consider packing a knife.
I was surprised the other morning when a molder I have known for a few years showed up at my office. He came bearing gifts in the form of a grocery sack full of clear parts that appeared dirty—they had large black streaks in the middle of the part.
The molder wanted me to solve a problem that had baffled him for several weeks. He set the parts out on my drafting table, which was OK since I don’t use it for drawing prints anymore—at least, not since they invented computers.
|
I took a good look at the streaks and asked what I could do for him. His answer did not surprise me that much. He said he had tried everything he could think of and he just could not get rid of the black streaks.
I gave him the rundown of things that could cause black streaks, such as contamination in the material or shear burning of the material as it was injected through the nozzle orifice, an undersized sprue, or an undersized gate.
He tried to convince me he had covered all the bases and was at the end of his rope on this problem. I told him the only place to start would be at the beginning—the same as I do on every part I troubleshoot.
I started with the undersized sprue that measured 0.200 inch where it attached to the two gates feeding into the part and 0.180 inch at the sprue O-diameter. I measured the length of the sprue and it turned out to be 3.25 inches long. Why was this significant? Well, I like to use at least a 1½° taper on the sprue, and for a sprue that is 3.25 inches long, I should see a taper of 0.057 inch (not 0.020 inch, as I measured).
Second, the part’s nominal wall thickness measured 0.100 inch. Then I burned the material for a sniff test and determined it was polystyrene (the molder agreed).
Next up was the thickness of each of the two gates—they were 0.080 inch deep and 0.150 inch wide with a land of 0.100 inch. The depth and width were OK for an amorphous material, but the land was too long. Nothing longer than a 0.030-inch land is acceptable these days.
The 0.180-inch sprue O-diameter was not large enough to feed a part with a 0.100-inch-thick wall. To properly fill and pack these parts, this dimension should have been 0.225 inch and 0.285 inch where the sprue attached to the gates.
To finish this fact-finding mission, we would size the nozzle orifice at 0.200 inch instead of 0.150 inch, and since this was an amorphous material, the nozzle needed to be a full-taper design instead of general purpose.
Outside or in?
|
To this point, I had found lots of errors that no doubt were causing problems for the molding technicians, but I wasn’t sure I’d found the cause of the black streaks. I told the molder that he should correct all the problems I’d found up to that point, but we needed to go a different direction to find the cure for his black streaks.
I reminded him of the fountain flow theory that makes it possible for us to inject thermoplastics into a mold: Plastic flows from the inside out where the maximum velocity of the material is in the middle of the flow path and the material on the outside of the flow has zero velocity during injection. This means that material in the machine nozzle, the adapter area, and even some of the front zone ends up on the inner and outer surfaces of the part. Depending on the size of the barrel, some of the front-, middle-, and rear-zone material ends up in the middle of the part walls all the way from the end-of-fill back to the gate area.
The key to this troubleshooting was to scrape the area of the part where the black streaks were with a knife blade and see if the black streak was on the surface of the part or in the middle of the part walls. Turns out the black streaks were in the center of the part walls, which meant the problem was in the machine barrel—in the front zone, or possibly the middle.
The problem would be determined after pulling the screw out of the barrel and finding out what was damaged. Would it be a screw flight broken off or a scratch on the barrel lining? Of course, it could be just a poor job of purging.
I suggested the molder build a metal box a little bit longer than the screw, soak the screw in a hot solvent overnight, and use a wire brush to clean off the caked-on material. Meanwhile, he could look for damage to the screw flights or to the inside of the barrel. I reminded him to check the barrel heaters to be sure that all the thermocouples were functioning normally and that none of the heater bands were overriding and running hot enough to burn the material in the barrel.
Proper purging
This pretty much put everything I had on the table. All I could do at this point was wait for an answer. It didn’t take long before I heard back from him, and it turned out the problem was poor purging procedures. I sent him a how-to sheet for amorphous purging procedures and figured I had helped him solve his problems.
So what was the big purging procedure I recommended? Make a mixture of 5 lb of virgin high-heat crystal polystyrene, 5 lb of easy-flow crystal polystyrene regrind, and 5 oz of water. Slowly introduce this mixture into the molding machine’s feedthroat and fill the barrel. Let this mixture sit for 20 minutes and then purge it out. Repeat the process as often as needed until the air purge comes out fairly clean. Then finish the purge with the virgin material you will be using for the next molding job.
Be careful when purging with liquids. Water turns to steam at 240°F in a closed vessel and you do not want anyone to get burned by the steam.
I waited a couple of weeks and finally called the shop. I found out they were running nice, clear parts again and all it took was the extra attention to detail when they were purging between jobs.
Sometimes we luck out by just doing a better job of purging. Sometimes we end up rebuilding or replacing a screw or barrel. This time we got lucky.
Troubleshooter’s 
notebook
Part/material: Crystal styrene lens.
Tool: Single-cavity cold runner.
Symptoms/problem: Significant black streaks around center of part.
Solution: Resize nozzle orifice and use full taper, shorten gate lands, increase sprue diameter, check screw for wear, validate purging procedure.
About the Author(s)
You May Also Like


