
Sign up for the PlasticsToday NewsFeed newsletter.
Sponsored By
By Design: Polypropylene part design, Part 2 – Living hinges
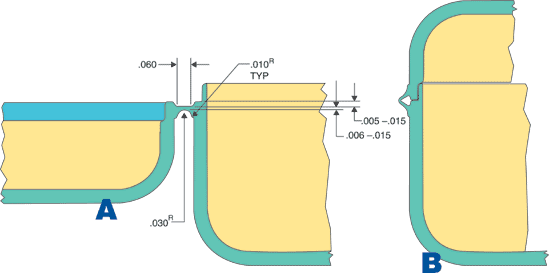
Figure 1A, 1B. Without a living hinge, this box would require two molds, two molding operations, and assembly.
Glenn Beall
July 25, 2002
6 Min Read
.svg?width=850&auto=webp&quality=95&format=jpg&disable=upscale "By Design: Polypropylene part design, Part 2 – Living hinges")
|
Figure 1A, 1B. Without a living hinge, this box would require two molds, two molding operations, and assembly. |
In this bimonthly column, Glenn Beall of Glenn Beall Plastics Ltd. (Libertyville, IL) shares his special perspective on issues important to design engineers and the molding industry.
Polypropylene is the ideal plastic material for integral, injection molded hinges. Polypropylene (PP) part design details were reviewed in the June 2002 IMM "By Design" article. This article discusses how to design strong hinges with extended flex life.
A few years after PP's introduction in 1957, engineers at Enjay (now ExxonMobil) noticed an unusual phenomenon while studying pigment dispersion in very thin-walled color chips. Below a certain thickness, the PP molecules oriented in the direction of flow. Bending perpendicular to this orientation resulted in a stronger part that did not break with repeated flexing. Bob Munns, who worked at Enjay at the time, coined the term "living hinge" and the name stuck.
The living hinge was introduced to the industry as a hinged recipe box at the 1963 NPE. Over the next 40 years, creative design engineers used living hinges in thousands of applications ranging from dispensing closures with hinged caps to automobile gas pedals and carrying cases. The current trend for parts consolidation and assembly minimization has created a renewed interest in integrally molded hinges.
Living hinges can have many shapes and functions. One common application is the pill box and cover shown in Figures 1A and 1B. These parts could be molded separately, but that conventional approach would require two molds, two molding operations, and assembly. Connecting the box and cover with a hinge allows both parts to be produced in one molding operation. This reduces cost while enhancing end-user convenience.
|
Figure 2A, 2B. Thicker does not necessarily mean stronger when it comes to living hinges. The proportions shown here have remained essentially the same for four decades, and demonstrate the need to balance a hinge's thickness, radius, and length. |
Design Criteria
Over the years, the industry has developed a good understanding of the relationship between material selection, part design, and processing that allows living hinges to be flexed more than a million cycles without failing. The proportions for a living hinge, as shown in Figure 2A, have remained basically the same since the early 1960s. The key design details are the thickness of the hinge, the radius below, and the recessed flat section above the hinge.
The thickness of the hinge must provide a restriction to melt flow that orients the molecules across the hinge. There is a significant decline in molecular orientation when the thickness of the hinge exceeds .015 inch. A thicker hinge is more resistant to bending, but it is a mistake to believe that it is more robust as it has less molecular orientation and a reduced flex life.
Bending the hinge, shown in Figure 2B, stretches the material on its bottom side. The thicker the hinge, the more stretching there is. With hinge thicknesses greater than .015 inch, the stretching can exceed the elastic limits of the material. This results in microscopic surface cracks that reduce the flex life of the hinge. PP materials with a high percentage of elongation are helpful in this regard.
The full .030-inch radius under the hinge is the ideal shape for melt flow through a restricted area. That radius also ensures that the hinge bends along a straight line at the apex of the radius.
As the hinge is bent, it stretches and deforms. The recessed flat section above the hinge allows the box and cover to fit together accurately while providing an open space for the deformed hinge (Figure 2B). The flat section above the hinge must be .060 inch in length. Its depth must be at least .005 inch to avoid a sharp bending of the hinge.
The force required to flex the hinge is determined by its thickness. This "feel" of the hinge is difficult to simulate, and as a result, the thickness of hinges is frequently changed after the first molding in order to create the desired feel. A trick of the trade that simplifies tooling modification is to start with the flat section above the hinge having a depth of at least .015 inch and a hinge thickness of .006 inch. If the cavity cannot be filled or the resulting hinge feel is too soft, the depth of the flat recessed section can be easily reduced to produce a thicker, stiffer hinge that is easier to mold.
Molding Considerations
The cardinal rule for good molding is to maintain a uniform wall thickness. Living hinges are a gross violation of that design rule. The restriction to melt flow across a hinge invariably creates a pressure drop on its far side.
The box shown in the opposite figures measures 3.250 inches by 2.500 inches with a combined height of 1.150 inches. The nominal wall thickness is .060 inch, with the gate located on the bottom of the box. A computer-aided moldfilling analysis indicated an average end-of-fill cavity pressure of 6687 psi in the box. The average cavity pressure in the cover was 3096 psi, with a low of only 743 psi. The reduced cavity packing pressure results in more mold shrinkage in the cover than in the box. These differences in shrinkage may require modification of the mold in order to achieve the desired fit between the two parts.
The .010-inch radiuses leading to the .030-inch radius and the flat recess above the hinge are important melt flow and cavity packing pressure considerations. These radiuses also minimize molded-in stress.
One technique for overcoming the differential cavity packing pressure is to provide gates on both sides of the hinge. In these instances the gates must be positioned to avoid a weldline in the hinge.
In order to encourage molecular orientation, the gate location must provide for the melt to flow across the hinge in a direction perpendicular to its length. Best results are achieved if the melt reaches the hinge along its entire length at the same instant. If melt reaches the hinge in some locations before others, it stops flowing and starts to cool. This condition results in molded-in stress and weldlines in the hinge. Moldfilling analyses can help indicate the best gate location for molecular orientation, uniform melt flow, and the avoidance of weldlines.
Additional molecular orientation and flex life can be achieved by bending the hinge a few times while the material is still hot from molding.
Forcing the melt to flow through the hinge requires high injection pressure and speed. Molds must be built strong enough to withstand these pressures. Flexing of the mold plates by only .001 or .002 inch has a drastic effect on the performance of the hinge.
The shear developed as the melt flows through the hinge generates heat. A properly designed hinge mold provides for adequate cooling at the hinge. Rapid cooling reduces crystallinity in the hinge and produces a longer-lasting living hinge.
About the Author(s)
You May Also Like